多路出口带宽代理实现

背景
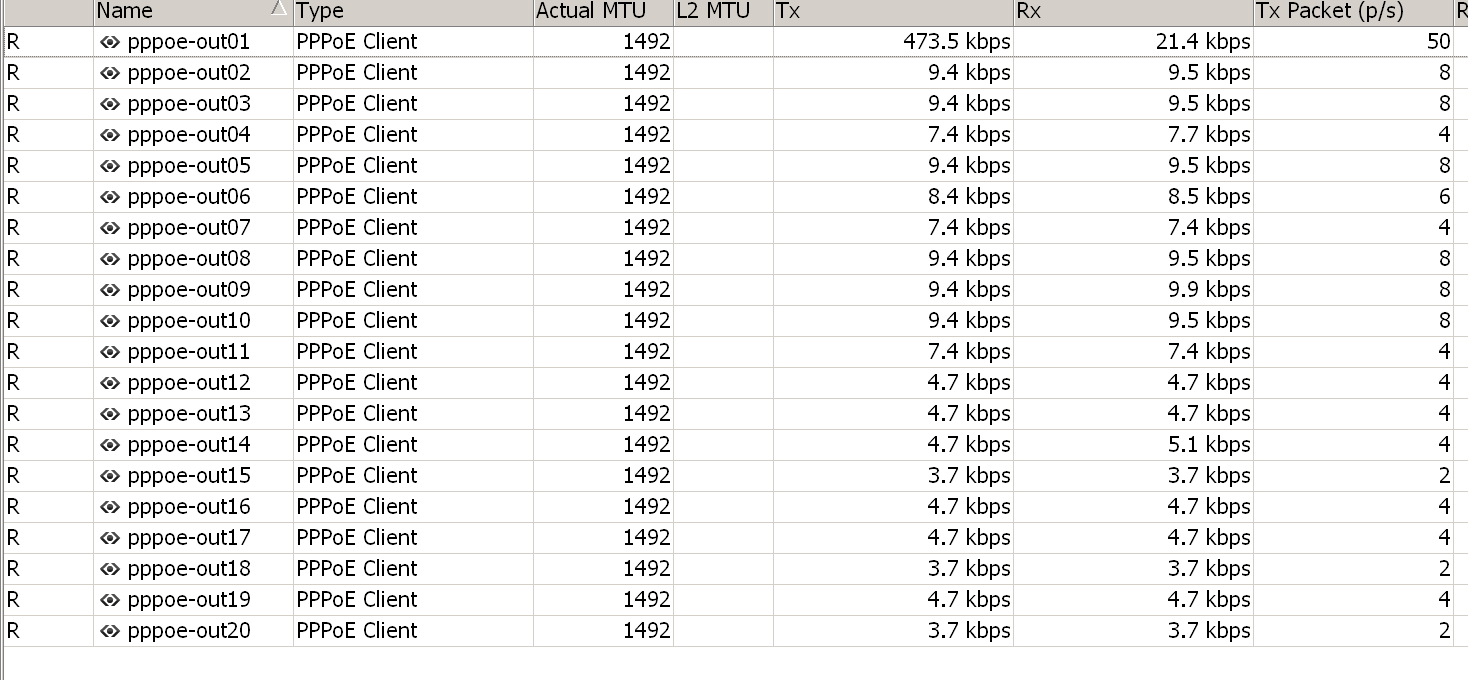
20条宽带出口实现20个独立IP的代理服务,如用户从出口A访问进来,代理服务也必须是使用出口A去访问被代理的服务。
涉及资源
- 交换机:华为 S5735S-L48TAS-A *1
- 路由:Mikrotik RB5009UG+S+(v7.2.3) *1
- 服务器:CentOS7.9 *1
- ISP: 电信(PPPoE拨号) * 40
涉及技术点
- 交换机:VLAN、Trunk、链路聚合等
- 软路由:SNAT、DNAT、Bridge、策略路由等
- 代理服务器: nginx(HTTP代理)、dante(Socks5代理)
网段规划
- 内网网关:172.16.255.1/24
- 代理服务器:
- 172.16.255.101/24 <-> pppoe-out01
- 172.16.255.102/24 <-> pppoe-out02
- ...
- 172.16.255.140/24 <-> pppoe-out40
部署要略
交换机设备
根据软规则对交换机进行如下端口规划:
| 序号 | 端口号 | VLAN | 备注 |
|---|---|---|---|
| 1 | GE 0/0/1 | 101 | pppoe-out01 |
| 2 | GE 0/0/2 | 102 | pppoe-out02 |
| 3 | GE 0/0/3 | 103 | pppoe-out03 |
| ... | |||
| 40 | GE 0/0/40 | 140 | pppoe-out40 |
| 21 | GE 0/0/45 | - | 聚合链路成员接口 |
| 22 | GE 0/0/46 | - | 聚合链路成员接口 |
| 23 | GE 0/0/47 | - | 聚合链路成员接口 |
| 24 | GE 0/0/48 | - | 聚合链路成员接口 |
Mikrotik RouterOS设备
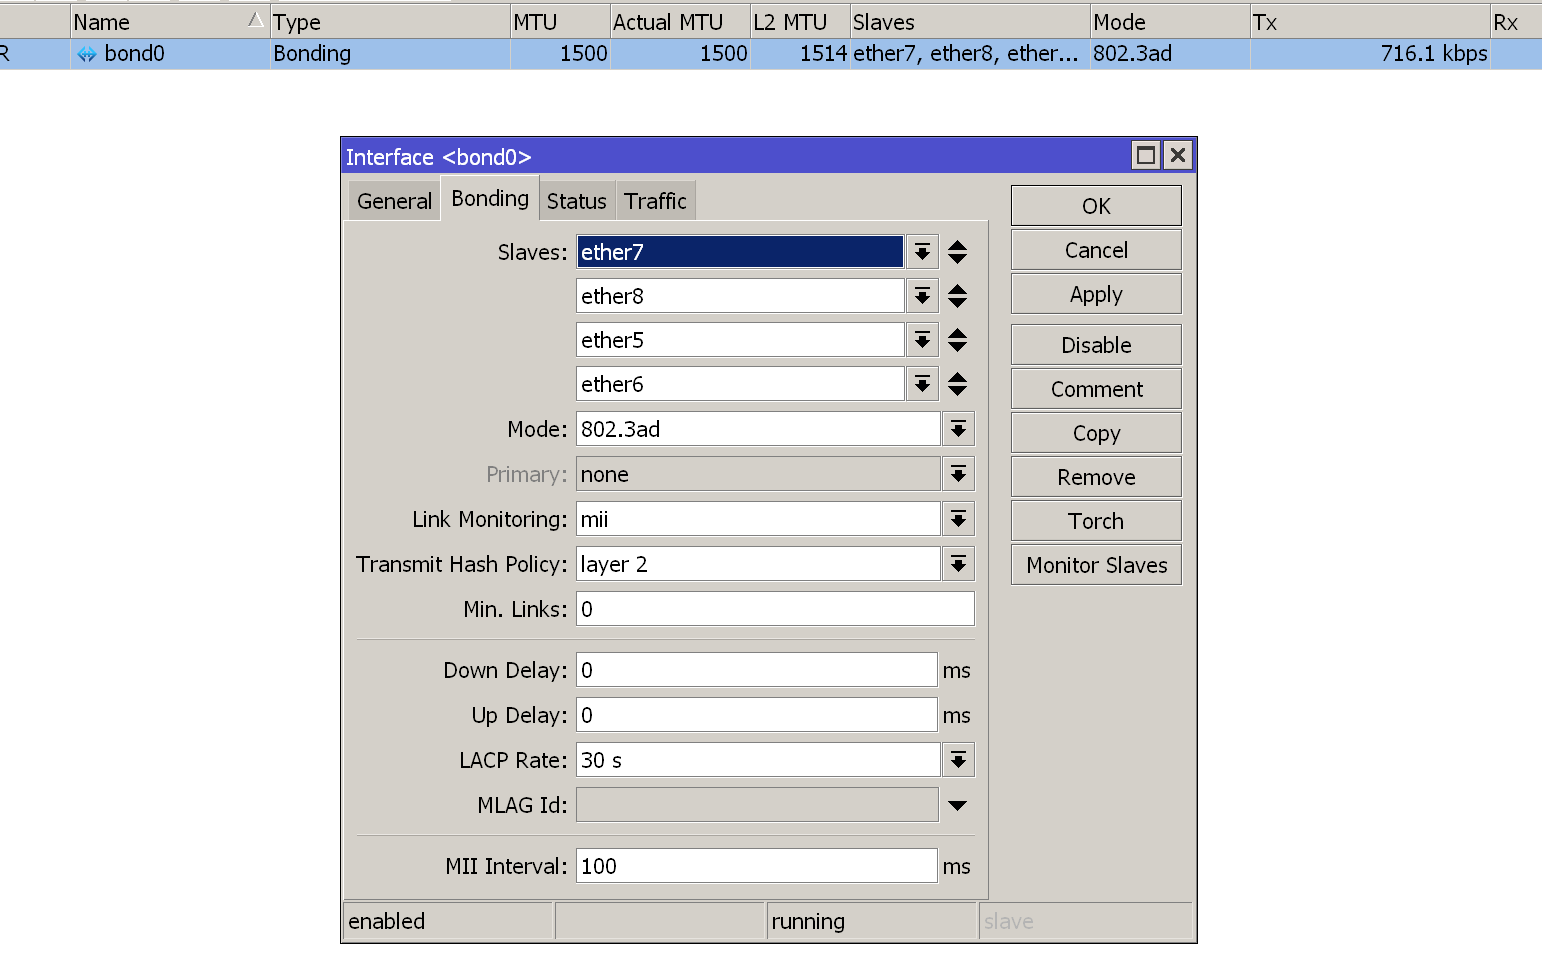
创建聚合接口
创建脚本
/interface bonding
add arp=enabled arp-interval=100ms disabled=no mode=802.3ad mtu=1500 name=bond0 primary=none \
    slaves=ether7,ether8,ether5,ether6
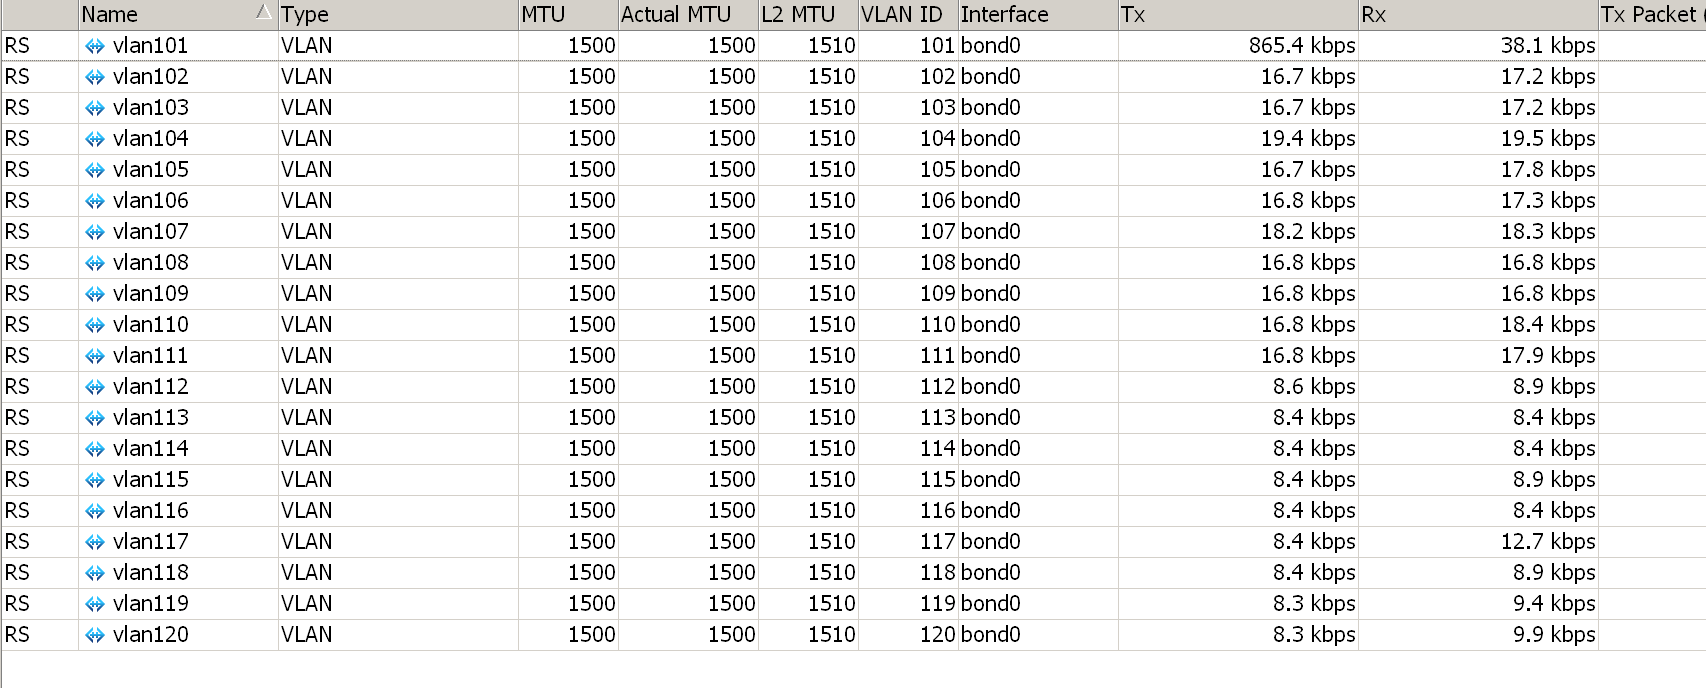
基于聚合接口创建vlan子接口
创建脚本
:for no  from=1 to=9 do={  /interface vlan add interface=bond0  mtu=1500 name=("vlan1".$no use-service-tag=no vlan-id=("10".$no) }
:for no  from=10 to=40 do={  /interface vlan add interface=bond0  mtu=1500 name=("vlan1".$no use-service-tag=no vlan-id=("1".$no) }
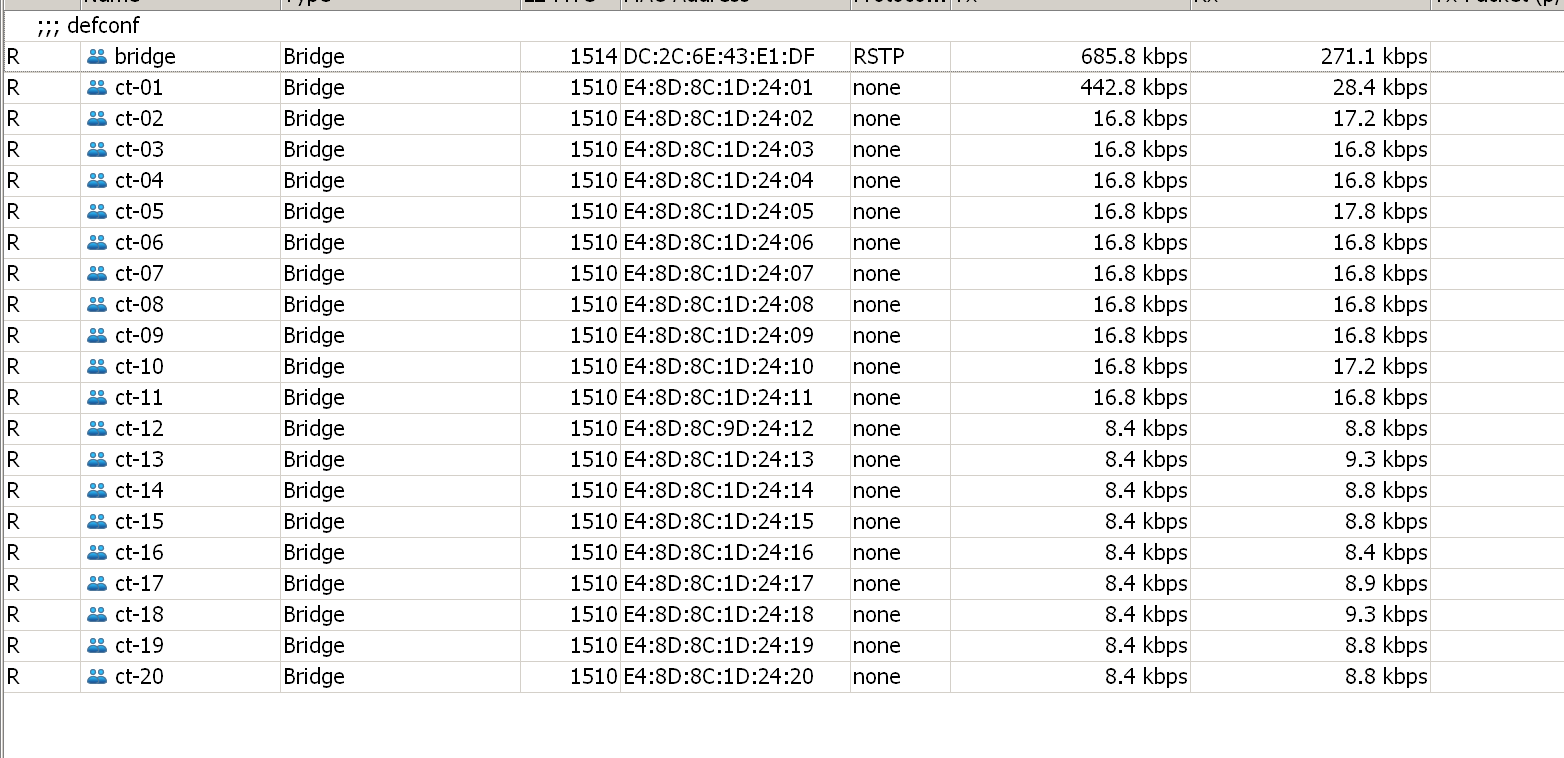
基于聚合接口创建bridge接口
新增专用bridge接口,脚本如下(部分省略):
<...>
:for no  from=10 to=40 do={ /interface bridge add admin-mac=("E4:8D:8C:1D:25:".$no) ageing-time=5m arp=enabled arp-timeout=auto auto-mac=no dhcp-snooping=no disabled=no fast-forward=no igmp-snooping=no mtu=auto name=("ct-".$no) }
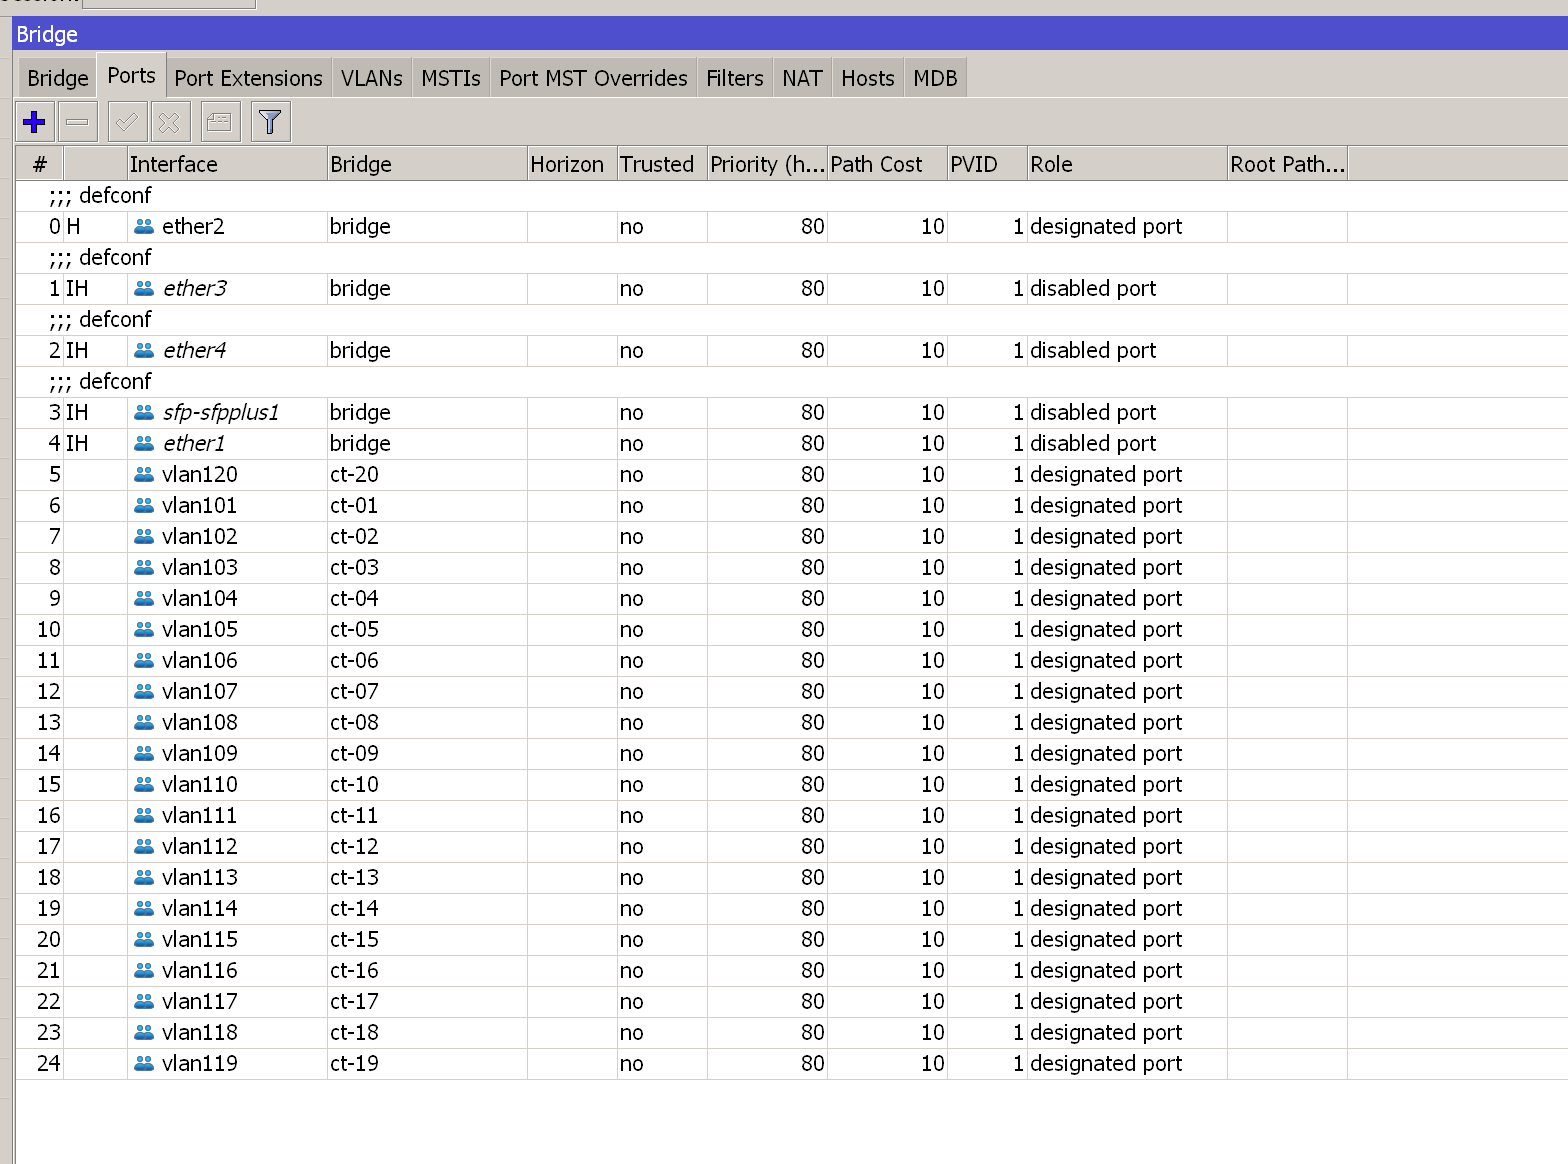
将vlan接口添加到对应的bridge接口
脚本如下(部分省略)
<...>
:for no  from=41 to=60 do={ /interface bridge port add auto-isolate=no bpdu-guard=no bridge=("ct-".$no) interface=("vlan1".$no) internal-path-cost=10 learn=auto  pvid=1 restricted-role=no restricted-tcn=no tag-stacking=no trusted=no unknown-multicast-flood=yes unknown-unicast-flood=yes }
创建pppoe拨号接口
脚本如下(部分省略)
/interface pppoe-client
add add-default-route=yes allow=pap,chap,mschap1,mschap2 default-route-distance=2 dial-on-demand=no disabled=no interface=ct-01\
  name=pppoe-out01 profile=default use-peer-dns=no user=USERNAME
add add-default-route=yes allow=pap,chap,mschap1,mschap2 dial-on-demand=no disabled=no interface=ct-02\
  name=pppoe-out01 profile=default use-peer-dns=no user=USERNAME
<...>
策略路由
每个源IP需要保证固定出口,所以我们需要使用策略路由来实现,大致方法就是根据源IP去决定走哪个出口,实现如下:
脚本如下(部分省略)
- 创建路由表
...
:for no  from=10 to=40 do={  /routing table add name=("proxy".$no) fib }
玛德,规则软过头了
- 在Mangle表中的Prerouting链定义源IP并生成20个路由表
...
:for no  from=10 to=40 do={ /ip/firewall/mangle add src-address=("172.16.255.1".$no) chain=prerouting action=mark-routing new-routing-mark=("proxy".$no) passthrough=yes }
- 根据创建好的路由表,添加路由
...
:for no  from=10 to=40 do={  /ip/route add dst-address=0.0.0.0/0 gateway=("pppoe-out".$no) routing-table=("proxy".$no) }
规则下次适度软下就好了。
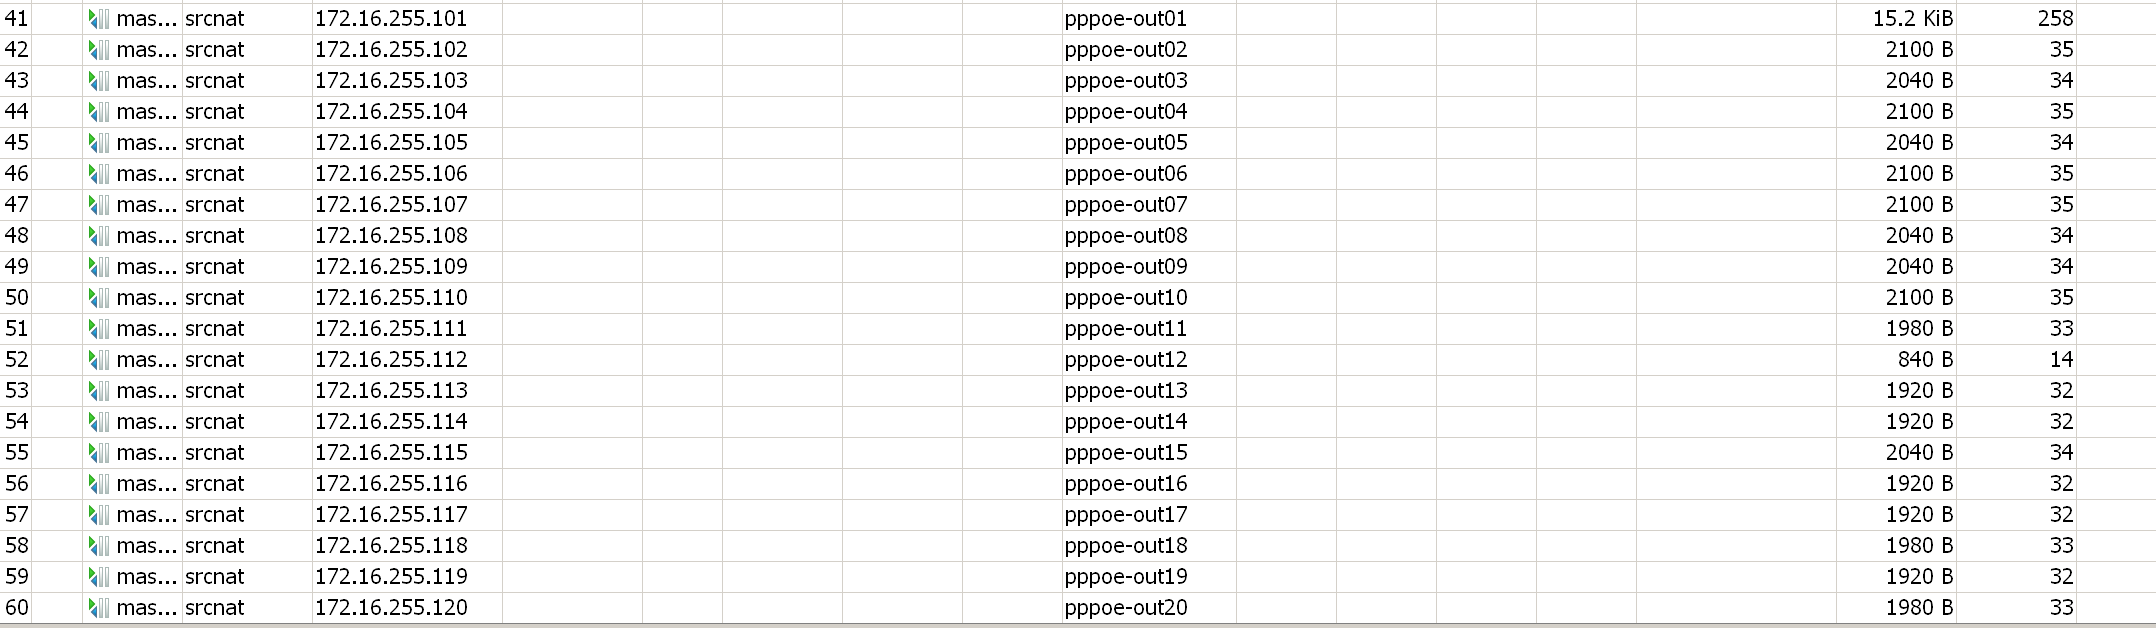
- 创建SNAT规则
...
:for no  from=10 to=40 do={ /ip firewall nat add action=masquerade chain=srcnat out-interface=("pppoe-out".$no) src-address=("172.16.255.1".$no) }
- 创建DNAT规则
<...>
:for no  from=41 to=60 do={ /ip firewall nat add chain=dstnat action=dst-nat to-addresses=("172.16.255.1".$no) to-ports=3014 protocol=tcp src-address-list=src-access-proxy in-interface=("pppoe-out".$no) dst-port=3014 log=no }

<...>
:for no  from=41 to=60 do={ /ip firewall nat add chain=dstnat action=dst-nat to-addresses=("172.16.255.1".$no) to-ports=3015 protocol=tcp src-address-list=src-access-proxy in-interface=("pppoe-out".$no) dst-port=3015 log=no }
因未配置用户名密码且客户都是固定IP,所以定义了一个源地址访问地址列表:src-access-proxy
代理服务器
多IP配置
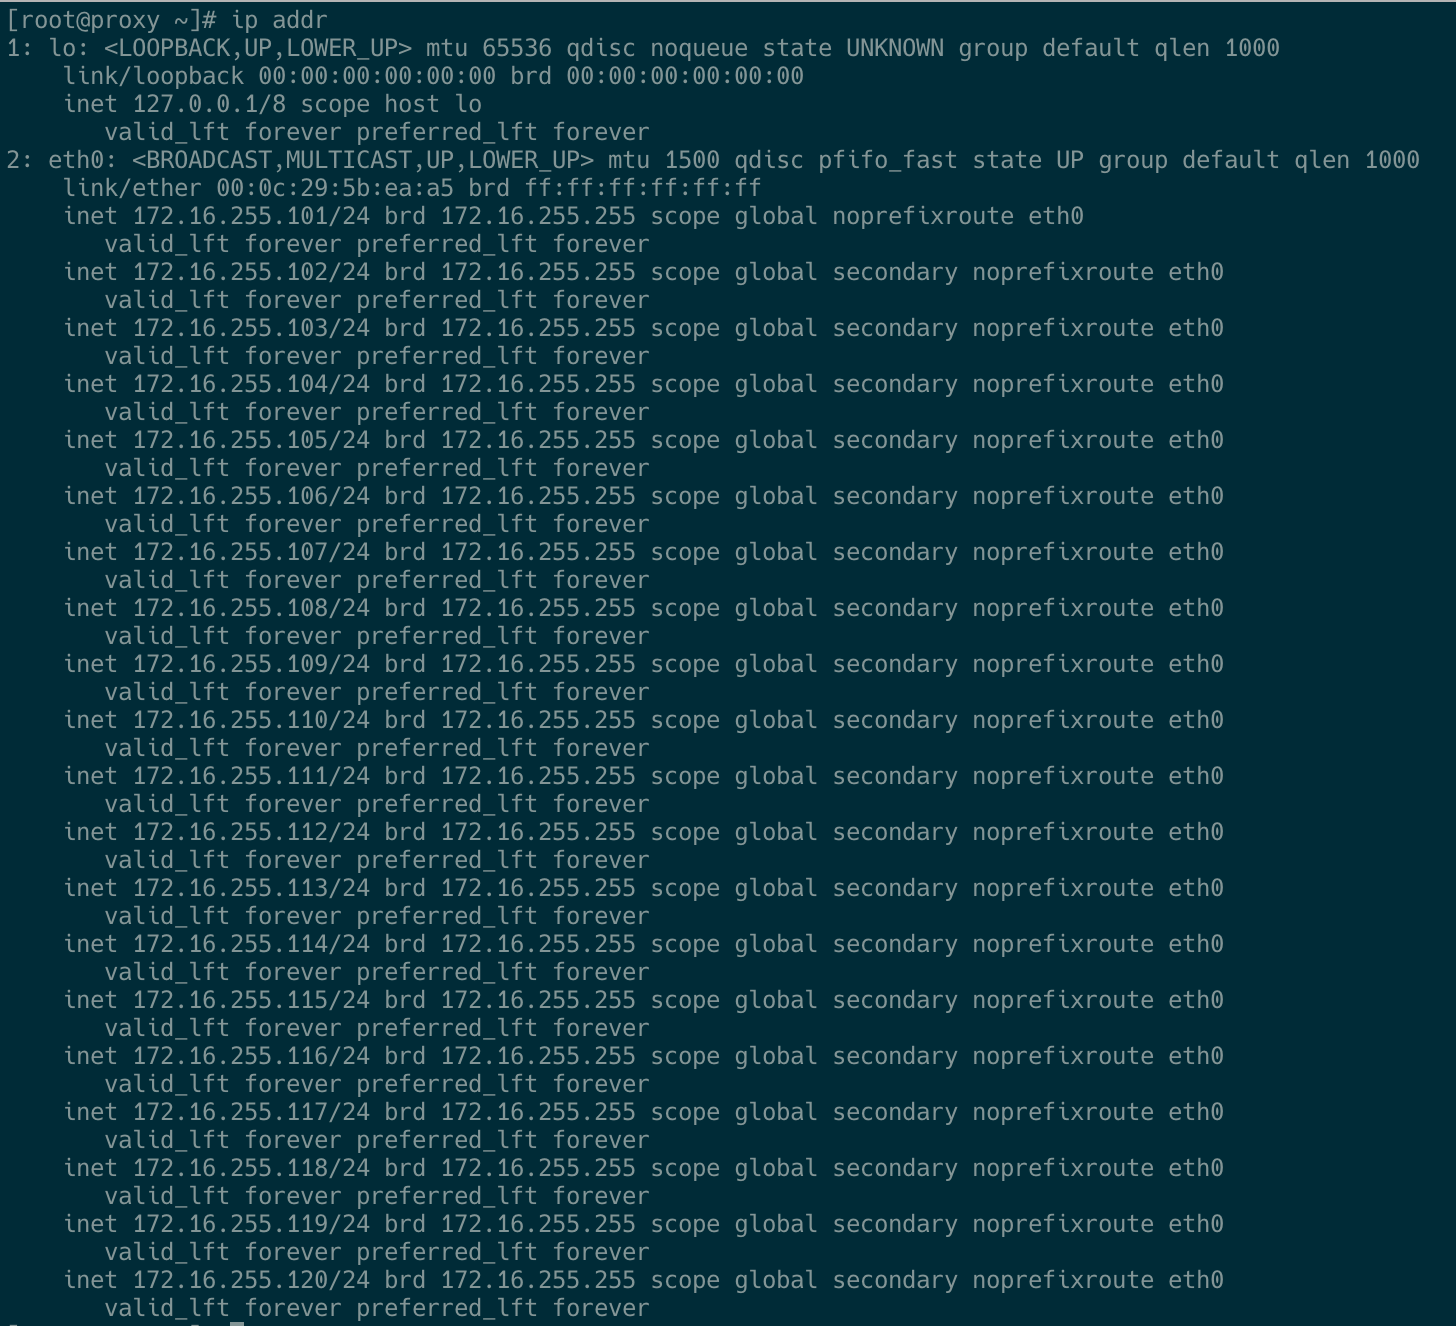
往`/etc/sysconfig/network-scripts/ifcfg-eth0文件中加入以下内容:
IPADDR1=172.16.255.102
PREFIX1=24
...
IPADDR59=172.16.255.60
PREFIX59=24
快速生效
# nmcli conn reload
# nmcli conn up eth0
socks5代理
批量生成配置文件、systemd服务
#!/usr/bin/env bash

prefix=172.16.255
port=3014

for no in {101..140}
do
cat  > /etc/sockd_$no.conf<<EOF
logoutput: syslog
user.privileged: root
user.unprivileged: nobody

internal: $prefix.$no port=$port
external: $prefix.$no

socksmethod: none
clientmethod: none

client pass {
    from: 0.0.0.0/0 to: 0.0.0.0/0
    log: connect disconnect error
}

socks pass {
    from: 0.0.0.0/0 to: 0.0.0.0/0
    log: error
}
EOF

cat  > /usr/lib/systemd/system/sockd_$no.service<<EOF
[Unit]
Description=Dante SOCKS proxy
After=network-online.target

[Service]
Type=simple
ExecStart=/usr/sbin/sockd -f /etc/sockd_$no.conf
StandardOutput=syslog
StandardError=syslog
LimitNPROC=infinity
LimitNOFILE=10240
Restart=on-failure
RestartSec=5

[Install]
WantedBy=multi-user.target
EOF

systemctl start sockd_$no.service
systemctl enable sockd_$no.service
done
查看端口监听状态
# ss -tln |grep 3014
LISTEN     0      511    172.16.255.140:3014                     *:*
...
LISTEN     0      511    172.16.255.103:3014                     *:*
LISTEN     0      511    172.16.255.102:3014                     *:*
LISTEN     0      511    172.16.255.101:3014                     *:*
HTTP代理
http代理第一闪现的是squid,经过测试squid在单节点多IP的场景不受控制,遂转入到nginx,使用以下脚本快速生成配置文件
prefix=172.16.255

for no in {101..140}
do
cat >/opt/nginx/conf/conf.d/$no.conf<<EOF
server {
    listen   $prefix.$no:3015;

    # forward proxy for CONNECT request
    proxy_connect;
    proxy_connect_allow            all;
    proxy_connect_connect_timeout  30s;
    proxy_connect_read_timeout     90s;
    proxy_connect_send_timeout     90s;

    proxy_connect_bind     $prefix.$no;

    location / {
        proxy_pass \$scheme://\$http_host\$request_uri;
        proxy_bind $prefix.$no;
    }

    access_log /var/log/nginx/${no}_access.log combined buffer=64k flush=1m;
}
EOF
done
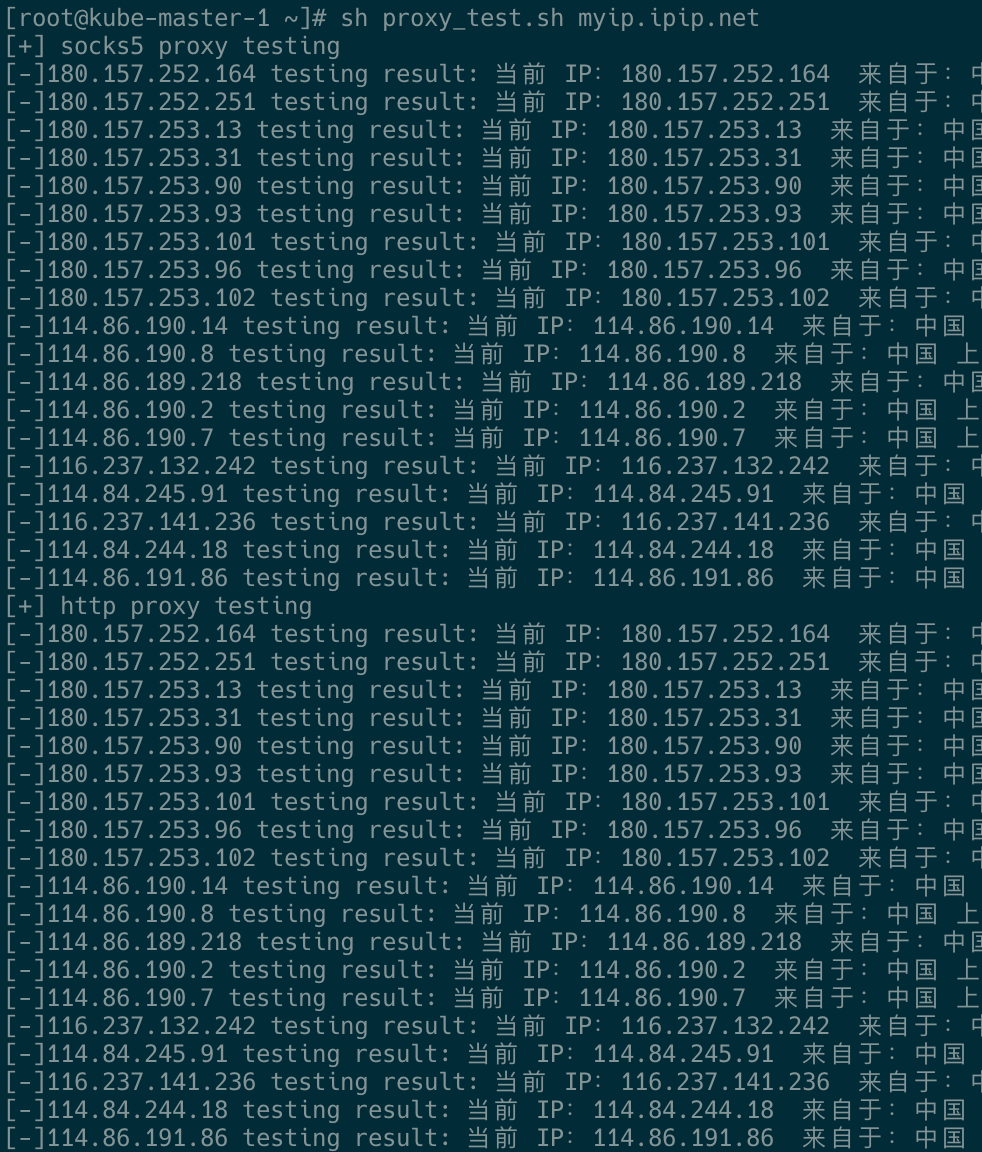
测试
测试脚本
#!/usr/bin/env bash


proxy_ips=(
   IP1
   IP2
   ...
   IP40
)

url=${1:-myip.ipip.net}

echo "[+] socks5 proxy testing"
for ip in ${proxy_ips[@]}
do
    echo "[-]$ip testing result: $(curl -s /dev/null --connect-timeout 3 -x socks5://$ip:3014 $url)"
done

echo "[+] http proxy testing"
for ip in ${proxy_ips[@]}
do
    echo "[-]$ip testing result: $(curl -s /dev/null --connect-timeout 3 -x socks5://$ip:3015 $url)"
done
测试结果:代理IP的返回来的IP一致。
后续
DDNS
由于是当前是使用IP,可以使用域名来绑定出口。
问题答疑
1、代理服务器重启后,有几个socks 地址代理失败,经过查看,失败是因为系统未监听该端口,查看日志,内存资源分配失败导致,当前虚拟机内存1G。加资源管上。